Monday, 20 June 2016

Stop! Collaborate and Listen!

Image result for stop collaborate and listen


If these words make you want to start chanting  “Ice Ice Baby”  then you probably had a great time during the ‘90’s. It is interesting to note that this song is (arguably) credited for putting Hip-Hop onto the mainstream billboard charts. Vanilla Ice goes on to sing about how a new idea he has had is changing life as he knows it - I’m fairly sure he is singing about the DJ lifestyle in Florida, however, the main idea of ‘Stop - Collaborate - Listen’ has, for me, changed teaching as I knew it. Group work used to give me anxiety  - I didn’t like participating in it and I struggled to let students engage in it … And then AVID came along and it changed the way I approach teaching!

Here's how:
  • STOP.
I had to learn to stop being in control. I had to STOP being the keeper of knowledge and acknowledge that students learn best when engaging with each other. I had to throw away the old “chalk and talk” structure and STOP telling students what to learn, and instead, show them how to learn.

Letting go was hard - especially for someone who likes to feel structured and organised. I like things planned; I want a beginning and an end; I like to tick boxes, account for syllabus dot points and process through things in a neat and organised manner.  I thought I knew what learning looked like in a classroom:
  • All students looking to the front of the room, at me.
  • All students writing in their books
  • All students are quietly working
To me, all these meant we were having a great lesson. Oh, how I’ve changed and it was my introduction to  AVID that changed this for me. As I’ve written about before, AVID works around the WICOR planning strategy and the ‘C’ in WICOR stands for Collaboration. A key feature of almost every one of my lessons now is collaboration but before I could see the benefits, I had to STOP feeling the need to control every aspect of the classroom.

  • COLLABORATE.
Through the AVID process, I learned that letting go of total control in the classroom did not mean laissez-faire. Collaborative learning involves intentionally designed student groups engaged in “co-laboring” toward meaningful learning outcomes, using active engagement activities planned to maximise learning, and facilitating the sharing of the workload. I came to realise that for collaboration to have purpose and be successful, I still needed to control aspects of the learning process. I found students needed scaffolds and support within the activities and groups. This meant that planning and developing resources were needed, and instead of controlling a lesson from inside the classroom, I was controlling a lesson through the planning process, from outside the classroom. AVID’s high engagement learning strategies involve collaborative activities through which individual students help each other learn, thereby strengthen their own learning. Students are responsible for their own learning; teachers serve as facilitators in a learning community working together for the success of the group. Of course, the type of planning or the amount of planning, depends on the purpose of the collaborative activity. I definitely plan a specific inquiry question that blends well with collaboration so that students know what it is they are setting out to achieve. At times, I plan which students work best together. I plan prior reading activities; I plan scaffolds to help students work through various aspects of collaboration. And, I think the most important plan, is developing common language that student understand within collaboration.

  • LISTEN.
A collaborative classroom is a noisy classroom - but if you have planned the process and given the students a structured scaffold of some kind, you will hear lots of discussion and lots of learning. Sometimes, a quiet classroom may mean that the students are simply disinterested in what is going on. We all know how boring it can be and how disengaged we can become when someone talks at you for an hour, where you are not allowed to talk or discuss or address issues around the topic being presented. Students spend a major portion of their day listening to teachers - no wonder they can’t take anything else in. Collaborative learning flips this around and allows students to do the talking and teachers to do the listening. I was able to spend time with each of the collaboration groups - this not only helped to build a rapport with the students, but it encouraged students to participate as well. If they can see that you are engaged, they are more likely to engage. I am able to LISTEN to what it is my students are saying - assess what it is they have learned, consider what they may have missed, support their learning by asking further questions. I am surprised on a regular basis, - sometimes good, sometimes not so good - by what I learn about my teaching from what I hear when I LISTEN to what, and how, students are learning.

It takes time to prepare purposeful and successful collaboration - students will not be good at  it straight away - I was not good at it straight away! Good collaborative skills needed to be developed. I needed to give time for confidence to build in individual students and trust to develop within the class and between the groups and sometimes, I needed to do the same collaborative strategy more than once so that students felt comfortable completing and/or participating in the activity. But the introduction of collaboration into my classroom as been worth it - there have been so many benefits that I have observed - I think Vanilla Ice would be proud of these observations. (Followed by my Top 5 Collaborative Activities)

20 Benefits I have observed from a Collaborative Classroom

  1. Develops higher level thinking skills
  2. Promotes student-teacher interaction and familiarity
  3. Builds self esteem in students
  4. Promotes a positive attitude toward the subject matter
  5. Develops oral communication skills
  6. Develops social interaction skills
  7. Creates an environment of active, involved, exploratory learning
  8. Uses a team approach to problem solving while maintaining individual accountability
  9. Encourages student responsibility for learning
  10. Enhances self management skills
  11. Encourages alternate student assessment techniques
  12. Fosters and develops interpersonal relationships
  13. Modelling problem solving techniques by students' peers
  14. Students are taught how to criticise ideas, not people
  15. Sets high expectations for students and teachers
  16. Students stay on task more and are less disruptive
  17. Addresses learning style differences among students
  18. Classroom resembles real life social and employment situations
  19. Collaboration processes create environments where students can practice building leadership skills.
  20. Collaboration increases leadership skills of female students

My Top 5 Collaboration Activities.
  • SNOWBALL - a quick and easy activity that encourages collaboration by sharing information about a topic. Students write some kind of information about a topic they are learning about onto a piece of paper. They then crumble the paper. The student’s throw their paper around the room, resembling a snowball fight. I usually play music while this is happening and when the music stops, the students need to collect one of the snowball papers. They read what another student has written about the topic. They can discuss this idea with the person standing next to them, or they can form small groups of three or four and discuss the ideas collectively.

  • JIGSAW - a cooperative learning technique in which students work in small groups. Jigsaw can be used in a variety of ways for a variety of goals, but it is primarily used for the acquisition and presentation of new material, review, or informed debate. In this method, each group member is assigned to become an "expert" on some aspect of a unit of study. After reading about their area of expertise, the experts from different groups meet to discuss their topic, and then return to their groups and take turns teaching their topics to their group mates.

  • PHILOSOPHICAL CHAIRS -  a technique that allows students to critically think, ponder and write their belief. After being presented with a statement that will elicit thought and discussion, they should be told they will argue the merits of the statement and that their position in the room during the discussion will illustrate their stance. For example, if they agree with the statement, they should sit on the right side of the room. If they disagree, they should sit on the left side, and if undecided, they should sit in the back. At designated intervals, student should be given the opportunity to change sides if they change their viewpoint.

  • CAROUSEL BRAINSTORMING  - Ideas gathered quickly, topic written as headings on chart paper. Students divided into groups and given different colored markers, move clockwise to brainstorm ideas. After all groups have written on each chart, they should do a gallery walk to see the ideas that were added. It  a great precursor to preparing a formal essay

  • FOUR CORNERS POST -  Four pieces of paper in the four corners of the classroom. Write a controversial topic on the board (for example: Schools should eliminate report cards). Have students move to the corner that best matches their position (Strongly Agree, Somewhat Agree, Strongly Disagree, Somewhat Disagree). If social cliques are a problem, have students write their choice on a card first in order to ensure honest reactions. Each corner will have 2 minutes to discuss and solidify their reasoning/logic. Each group selects a spokesperson to express the group's position. He/she has 30 seconds to express thoughts concisely and persuade their classmates. Other groups must listen intently. After the first corner presents, invite those who have been persuaded to move to the appropriate corner. Direct each group to present their group's position in turn. Allow students to move to the appropriate corners if they have changed their minds

Saturday, 23 April 2016

Lifting the ceiling on High Order Thinking.

learning.jpg
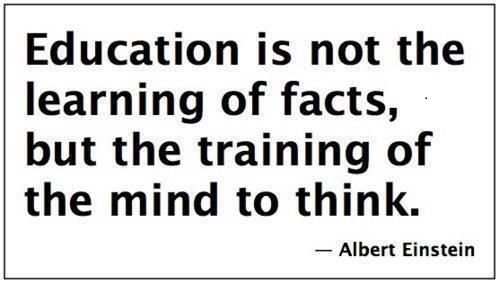
I love this quote! Einstein knew this - he knew that if learning meant being able to state the facts that somebody else had worked out, there must be nothing new to learn and therefore, to learn something new meant that you need to be able to think beyond what you are being told - hence we have the Theory of Relativity.

Sometimes, we assume our students can't do the thinking on their own, so we do it for them. We give them a ceiling of expectation. We lower expectations so that students, and sometimes their teachers, feel like they are achieving. But since there’s no need or expectation to extend and grow, students learn to live comfortably below the ceiling. It doesn't seem too bad while they're in the classroom. The problem occurs when they leave your room, go elsewhere, and realise they haven't grown enough to reach the things the world expects them to be able to reach on their own. We often see this with students transitioning to senior years to complete the HSC. Students who are high achievers in junior years struggle to maintain high results at HSC level as the high bands require sustained High Order Thinking (HOT) that the ceilings we have built in their junior years may not have developed thoroughly. Our goal ought to be to remove these ceilings; but if we consistently set assessments and pose questions that have very clear and reachable endpoints, students are going to keep bumping their heads on the academic ceilings we have built above them.

All students need and deserve a challenge. The high achievers and gifted students are the ones who least consistently receive one. Many of the strategies AVID uses to engage students are designed to add that support when necessary. Most teachers feel comfortable and justified adding scaffolding to help modify or adapt the learning for those who struggle; however, many times we forget about the students on the other end of the spectrum.  High achieving learners are wonderfully compliant and have learned that if they do what’s expected, they can rest comfortably for extended periods of time without having to exert much effort. Others become behaviour problems as they seek to entertain their idle brains!

Learning to think is a powerful tool. It allows you to understand the world around you, and to be critical, and have perspective, and develop empathy - all high order thinking objectives. It doesn’t happen easily. Henry Ford once stated “Whether you think you can or think you can’t - you’re right” and it is often this mindset that keeps students, and their teachers, from challenging themselves because they already think, or have been told, that they don’t need to do any better. Dr. Carol Dweck (psychologist), in her book Mindset (2006), states that changing the mindset of a student is the greatest way to encourage thinking. She believes that moving a student from a fixed mindset to a growth mindset has more to do with the teacher, and the environment they create within the classroom, than it does with the student.  Dweck’s Mindset Theory suggests something as simple as “The Power of Yet” could change the way students see their abilities. This involves having students add the word ‘yet’ to the end of many statements we regularly hear in the classroom:
“I don’t get it … yet.”
“I can’t do this … yet.”
“This doesn’t work … yet.”
“I’m not good at English/Maths/Science … yet.”

Thinking hurts! It is hard work. It takes effort and time; both of which we do not always cater for in the classroom. We can be so busy giving students information that we can forgot to raise the ceiling by asking the questions that create a ‘thinking’ environment.

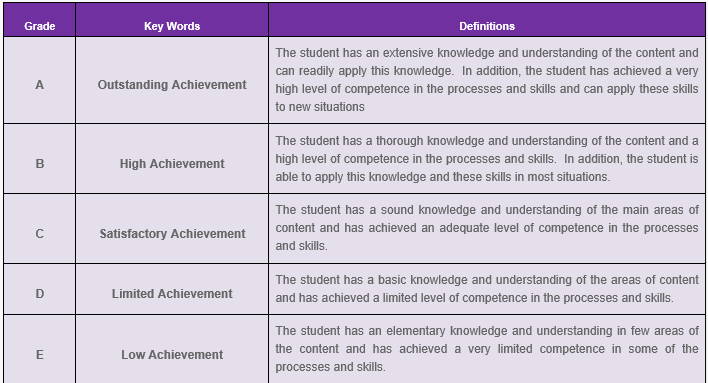
When students ask “How do I get an A in this assessment?” or “Can I get a Band 6 in this subject?”, we need to be ready and able to set them up for the challenge. When we look at the Common Grade Descriptors set by the BOSTES, we can identify the skills that are required to demonstrate a student's level of thinking. To get an ‘A’, a student needs to demonstrate their ability to readily apply extensive knowledge and skills in new situations - this requires the ability to think beyond the facts, push through the ceilings, question the information they are being given and create new meaning for the facts.
Assessment-grades.png

How do we develop High Order Thinking skills?

By making sure we remove any academic ceilings we have created and allow students to develop their thinking skills.

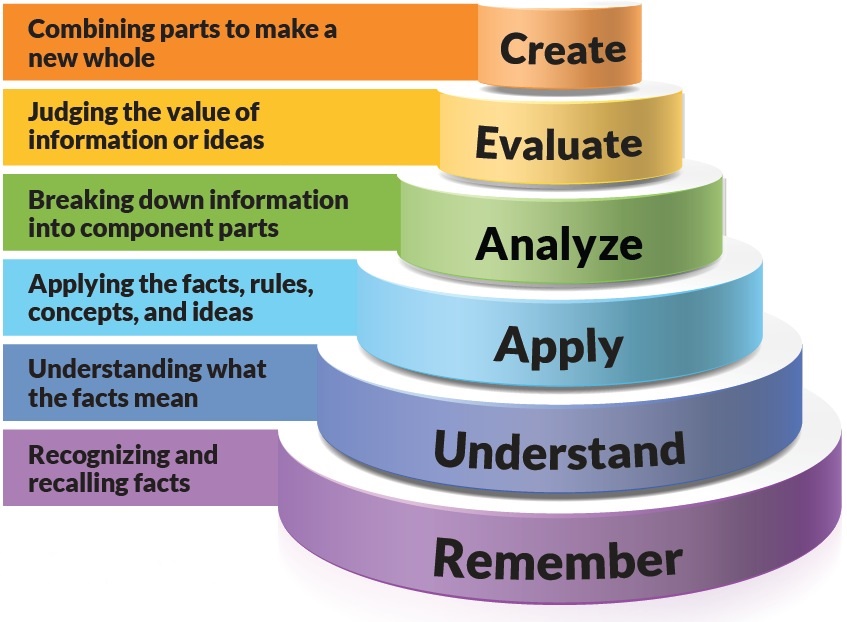
According the Dweck’s Mindset Theory, the brain is a muscle that needs to be trained. Students need to be given the opportunity to train their brain. Bloom’s Pyramid of Learning demonstrates levels that students can process though in order to ‘train their brain’. These levels of thinking and the various skills within the pyramid are required to become a High Order Thinker. The tasks and assessments we set ought to allow a student to think at a higher level than they thought they were capable of and, as teachers, we need to make sure that they understand the requirements of each level of thinking. This is what the Common Grade Descriptors are asking for and is required to move a student from a C to a B to an A.
Blooms_Taxonomy_pyramid_cake-style-use-with-permission.jpg
For example, if a student completes a task where the skills only require them to remember and/or understand facts, then they are demonstrating skills at an adequate or satisfactory level, at the most. Even if they get 100% in the remember/understanding task, they have not demonstrated that they can think beyond the facts - they have not been required to apply, analyse, evaluate, create something out of the information they have learned. Importantly, they have not been given the opportunity to readily apply extensive knowledge and skills in a new situation.

These tasks may have some place within the learning process, but we need to ensure the students understand that their abilities are only being challenged at a low order thinking level. It may sound mean and I am in no way suggesting we put students down - I am a big believer in positive recognition; however, if we are not being honest with what we are asking students to achieve, we become engineers in building the ceilings that keep students at a certain learning level. Students will develop a ‘halo effect’ about their abilities. This halo effect tricks students, and sometimes teachers, into thinking they are achieving at a level higher than they actually are - I got 100% or an A, therefore I am clever at this. That required me to exert this kind of effort and that is all I have to do to be clever - and when we need them to push through the ceilings for the HSC, and they do not really know how or the amount of effort that is required - they have not 'trained their brain'.

How can we create lessons, tasks and assessments to promote Higher Order Thinking?

By considering the actions that are expected from the students to demonstrate their knowledge and skills and ensuring they are included within the instructions of the lesson, tasks and assessments.

Basically, what is it you are asking the students to do and how are you going to ask that? An AVID strategy used to ensure that a task promotes Higher Order Thinking is Questioning. Developing a strong question and breaking it down with students helps to understand what it is they are supposed to be learning. It can also work the other way; have students formulate their own questions and explain to you why they are asking that question.

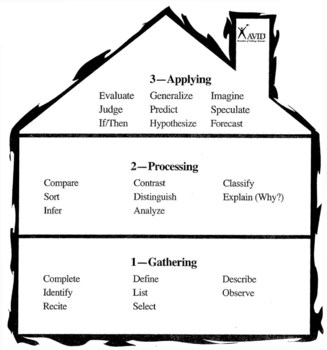
In an AVID classroom each lesson starts with an essential question - it acts as a learning goal for the lesson. To develop an essential question, you need to consider what it is you want the student to know, practise and demonstrate during a lesson? AVID uses Costa’s Levels of Questioning to help develop thorough questions - it works at three levels of intellect and is often illustrated as a house.
Costa's Level of Questioning.jpg

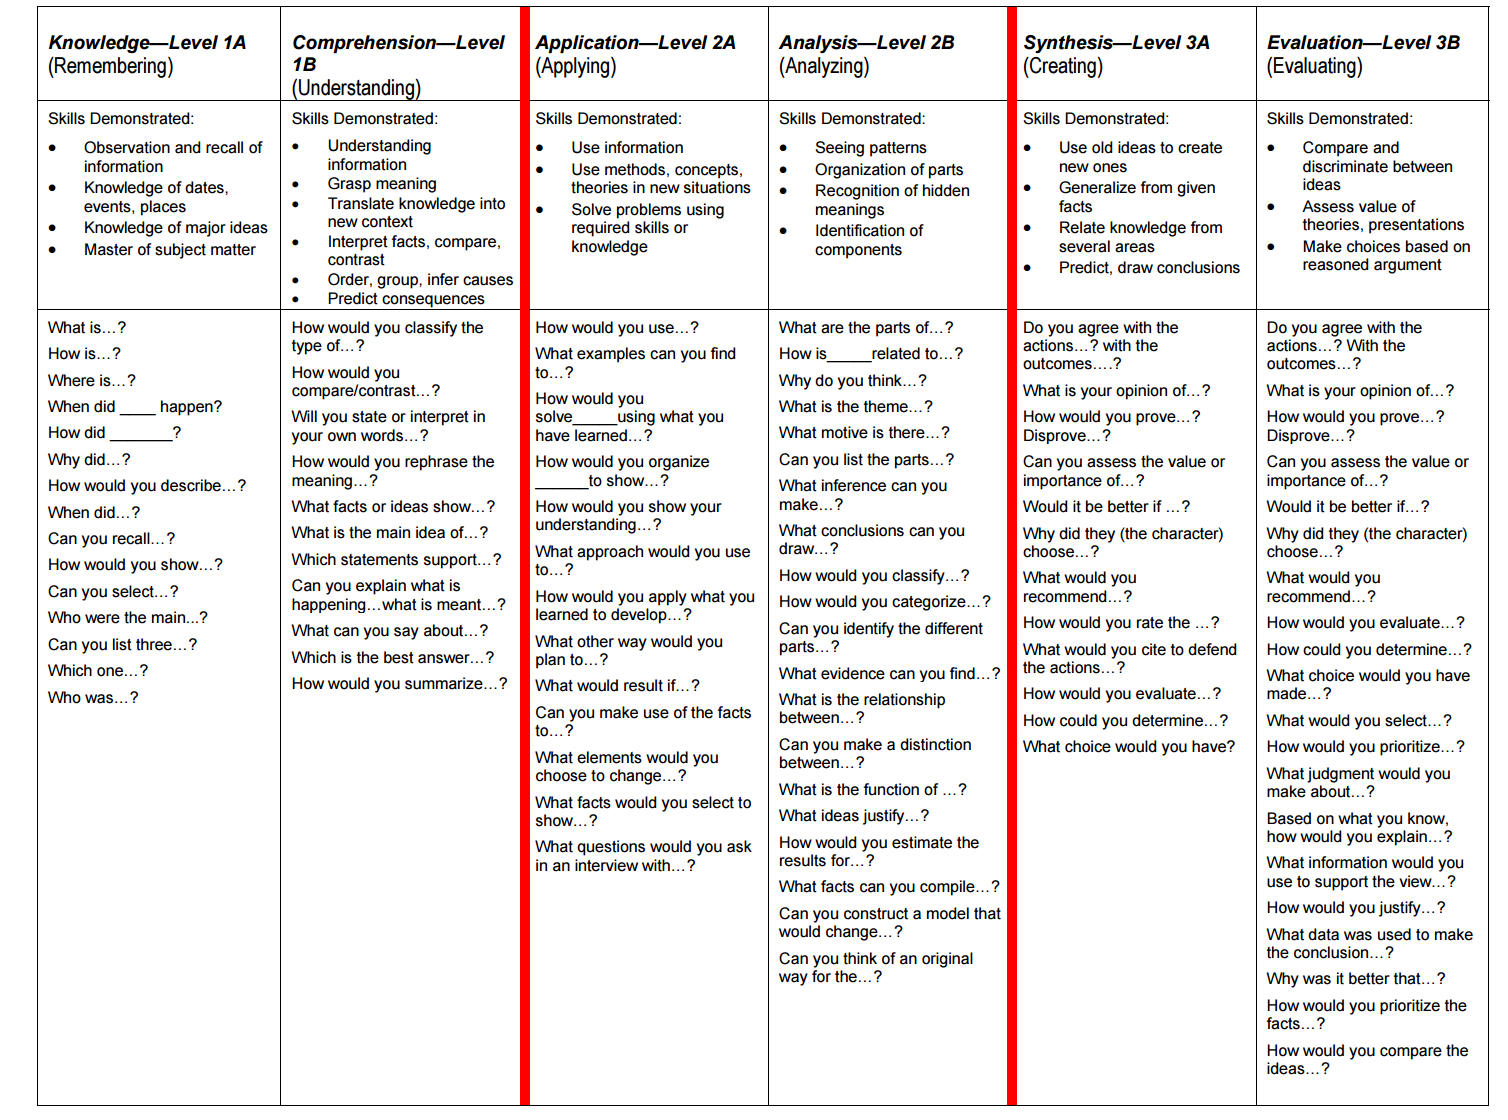
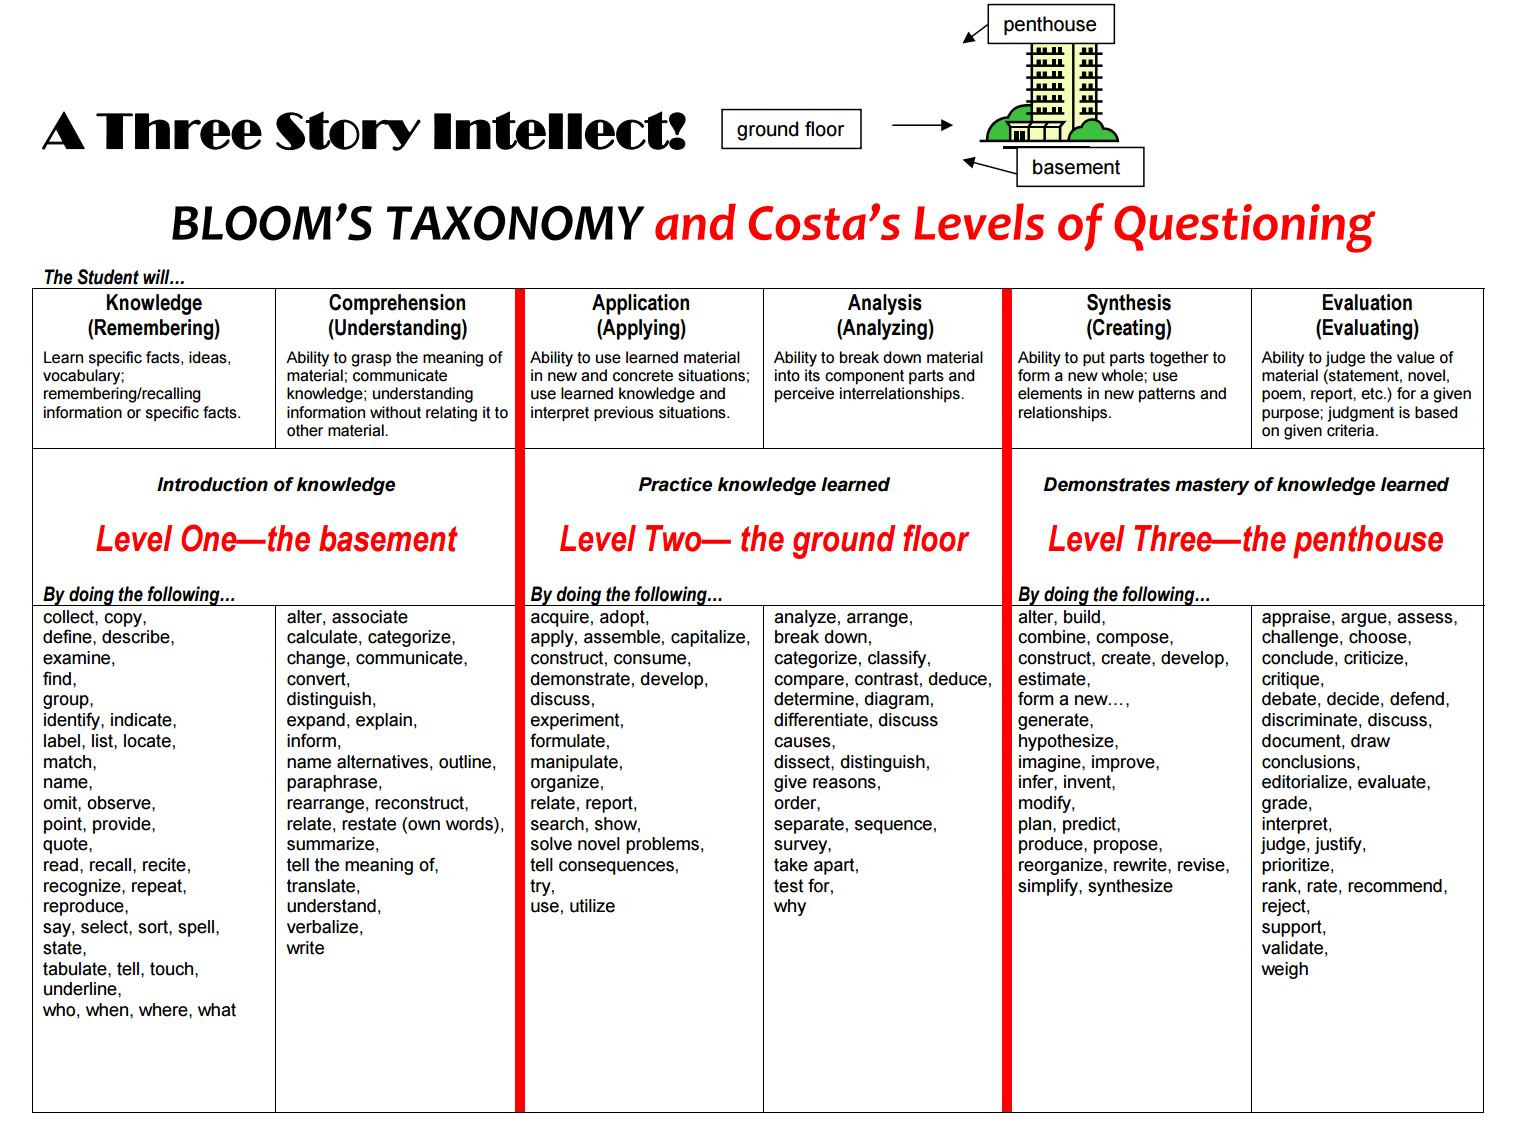
Bloom’s Taxonomy works really well with Costa’s Levels of Questioning as demonstrated in the handout below. Use this handout as a scaffold for developing essential questions, class tasks and assessments. Spend some time examining the cognitive level of the questions and thinking in your classroom. Realising that some students will struggle to master the Level 1 knowledge and skills associated with your curriculum while others will catch on quickly, come to class prepared to challenge your kids at whatever level necessary. Level 2 and 3 of Costa’s Levels of Thinking requires students to make connections (within disciplines and among them), draw conclusions, predict, create, suppose, and evaluate.  Providing increased opportunities to explore the curriculum at higher levels keeps the ceiling high above students’ heads.

High Order Thinking is essential for training students’ brain to think, altering mindsets and to make sure we are not constructing academic ceilings. Developing High Order Thinking activities within the classroom and through assessments will help to move students through the levels within the Common Core Descriptors. Above all, High Order Thinking is essential if we are to raise the expectations of the students themselves; helping them to realise, as Einstein did, “Education is not the learning of facts but the training of the mind to think”. blooms-costas.PNG
bools-costas2.PNG

Wednesday, 13 April 2016

How can taking notes make a students grades better?


Anytime a teacher writes on the board we are often bombarded with the question “Do we have to write this down?”. It is very hard not to roll your eyes when you hear this; let face it, we don’t write things on the board for our own benefit. But I can’t blame students for thinking that copying notes is a waste of time. Copying notes mean nothing if you don’t do anything with them. Students need to interact with the notes they make. They need the notes to be made in a style they can relate to and make sense of and has a purpose for what they see as learning something relevant.

Becoming an independent note-taker is an essential skill for students that helps to transform them from a student that regurgitates information to a student that thinks beyond the page and engages with their learning. 

Yes, it takes time.

No, not all students like it ... straight away. 

Efficient note-taking takes practice but it allows the student to engage with their notes several times before the notes are completed and this repetition of going over the notes means the information has more of a chance of being remembered.

The AVID way of taking notes is called Cornell Note-taking. Notice the term “note-taking” – it is not referred to as “note-copying”. Cornell notes provide the scaffold for students to take, make, interact and reflect with their notes. The emphasis is on the students engaging with their notes in ways that make the notes their own – not simply copying them from the board and never referring to them again.

This is what Cornell Notes looks like – you can use printed off, pre-planned paper, but mostly, you can make your own by having students draw up the scaffold in their workbooks. My AVID class has this down to a 10-second process.
                                                     

Cornell notes are designed so that students are taking notes about any new information they are learning. There are four parts to this process:
  1. Note Taking
  2. Note Making
  3. Note Interacting
  4. Note-reflecting

Taking Notes
Filling in the information at the top of the paper allows the students work to be organised. Information such as date, class, topic, objective creates an easy reference tool and makes it easy to refer back to information at a later stage. The Essential Question basically addresses what the aim of the lesson and what students are going to learn in this lesson. It addresses the question “what are these notes going to tell me when I finish writing them?”. It is usually given to the students by the teacher.

The notes section is where students keep their own notes that they have taken in class – from anything - reading a textbook, listening to a lecture from a teacher, watching a video, doing a science experiment.They can use their preferred style and organisation. They write their notes in this section anyway they want to, anyway that they know that they are going to remember them and know why they wrote them, so there is no particular form or fashion. Students should be encouraged to take notes the way they like to take notes.

Making Notes
Making notes clearer so that they make sense to the student.Students need to spend time going back over the notes they have taken to make their notes usable. They can use several different methods to make their notes usable. They might underline key information, they might fill in gaps with a partner  - what did they write down that the other didn’t or vice versa – they might look for chunks of notes,  write corresponding questions in the questions column, make their own study questions about the information.

 Note Interacting
This part of the process allows students to create questions and summaries from their notes. It is about the studying of the student’s notes. They will answer each question that they have written in the questions column to compose a summary that helps to answer those questions in the summary section of the page. These completed notes become a learning tool and study reference to come back to when revising the topic.

Note Reflecting
Students should take the time to consider how the notes could be better – are there things the student still doesn’t understand? Where is the point of confusion? Students need to spend time going back over their notes to make their notes better. This might still be happening after they have completed a topic or an assessment task. If students have been given feedback on their notes the reflection process gives them a chance to address that feedback and see how they can improve on the notes they have taken. Students also need to be given time to reflect on how their notes have prepared them for the topic or the assessment. If they have done well in a topic or assessment, their interaction with their notes has been sufficient. If they haven’t done as well as they would like, then reflection on the engagement with the note-taking process will be necessary.


Copying notes from the board do not allow time for students to remember information. There is an art to remembering information and it is based on a study by Psychologist Hermann Ebbinghaus called The Rate of Forgetting. His research showed that the very first day that you learn some new information, you are going to retain about 100% of that information. On day 2, if you spend 10 minutes on that information you will retain most of that information. On day 7, doing that same amount of revision, you will retain a high amount of the information. Even a month later, if you spend the same amount of time, assuming that you’ve spent 10 minutes each day revising the same information, you will have a high percentage of retained information. So consistent revision is essential to retaining information. Keeping well-organised notes bodes well for when you are completing an assessment task a couple of weeks after you’ve originally learned the information – making efficient and organised note-taking is very important.

 “How can Cornell Notes make grades better?”
This video is from the AVID online modules and addresses this essential question.


Monday, 29 February 2016

When the light bulb turns on.

                                           Lightbulb by kwl617

I had an ‘a-ha’ moment this week with my AVID class.

In an AVID class, when a student finally sees the point of a topic or task, and their light bulb goes on -  we call that an ‘a-ha’ moment -  and we actually get them to make note of it in their workbook by putting an exclamation mark (!) next to whatever it was that helped them get the point. It’s my favourite moment in a classroom.
But this time it was my ‘a-ha’ moment. It was when the AVID students were partaking in the tutorial process and I was partaking in Quality Teaching Rounds. I saw how two independent parts of something I was involved in, came together - my light bulb went on and I mentally stuck an exclamation mark next to it.
Quality teaching is a term that I had heard, and thought I understood, before I became involved with the framework. Basically, the framework is a list of  qualities that a lesson needs in order to make it an engaging and relevant lesson. In the rounds a small group of teachers collaborate to discuss teaching strategies and observe and code lessons against the Framework, all the while seeking suggestions and feedback on how a lesson might become more engaging and relevant - adding quality.  It is a thought-provoking way to keep your teaching strategies on point. The framework gives you something to “hang” your skills on.
This is my second time being involved in QTR. The first time was prior to me completing any AVID training or knowing anything about AVID. During the AVID training, I had thought that the strategies link in extraordinarily well with  the Quality Teaching Framework - they just seemed to fit together. All the strategies could be hung onto an area of the framework. This was my first ‘a-ha’ and I thought the only way I would truly know if AVID equalled quality teaching was to be involved in QTR a second time. My goal was to have my QTR group observe an AVID lesson and code it against the Quality Teaching Framework.
So, this week my opportunity came around.
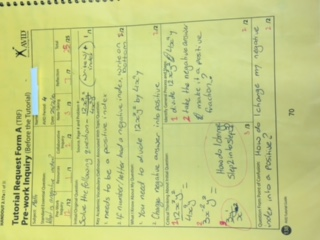
As part of the AVID process, the students take part in Tutorials. Each student has to think about the work they have undertaken throughout the week and consider a section that they have not thoroughly grasped - we call this the Point of Confusion (POC). They are then able to work with a small group of students to try and determine the answer to their POC. The most interesting part of a tutorial is that it is not run by a teacher - the students work with a tutors from the University of Newcastle - and the students love it!
A tutorial works like this:
  1. Before the tutorial date, each student must complete a Tutorial Request Form (TRF) - this helps them to develop their Point of Confusion about a topic.


  1. Students attend the tutorial and they present their POC to their group.
  2. They work in the library with whiteboards and the whiteboard tables and they write down the process their thinking goes through. (You should try booking the library for group work activities - students like writing on the tables.)
  3. The group’s job is to support the student to come to an understanding about the POC - they are not to tell the student the answer - they have to ask questions that will guide the student to the realisation - this realisation is the ‘a-ha’ moment!
  4. Once a student has had their ‘a-ha’ moment, another student gets a turn to present and the process starts again.
It is a hard process. Next time someone asks you a question, try it - try not to answer their question directly. See if you can ask them a series of smaller questions that may lead them to understand how to come to an answer themselves. It’s a tough strategy, and sometimes it takes longer than others, but the process encourages students to think about their learning path.
Anyway, getting back to my ‘a-ha’ moment! This week, during Quality Teaching Rounds, we coded a Tutorial against the Quality Teaching Framework -  And it was brilliant!! Every section of the Quality Teaching Framework’s target was hit at a high level. This meant that the intellectual quality of the Tutorial was high - students engaged with problematic knowledge, used higher-order thinking through substantive communication. This meant that a quality learning environment was created through student engagement, high expectations and a positive social support network. It also meant that Tutorials have significance to students as they are all included in the process and are able to bring what they do know to the table and express their understanding - each Tutorial is about what they do know and using it to understand what they don’t know.
Light bulbs went off in my head - A-HA!!! For me, this is why AVID is working and the strategies are important. It fits beautifully into Quality Teaching.  Turns out AVID and Quality Teaching are not two independent projects I was involved with. They are intrinsic of each other and the students are benefiting from these two independent aspects of teaching working together.
AVID = Quality Teaching = AVID
If you get a chance to work with the Quality Teaching Framework by participating in a Round, I truly hope that you take the opportunity. Teachers should never stop learning and I have learned so much from collaborating with colleagues and inviting them into my classroom - I hope that you have many more ‘a-ha’ moments and your light bulb shines brightly.
Lightbulb by kwl617